Sunday, October 18, 2009

Shredit Card

Credit cards come and go, but when they go, it’s usually our job to make sure they do. Most people just cut the card in half and drop it in the trash. If you do so too, that could be a costly mistake. The magnetic stripe on the credit card can be quite easily read even if the card is cut, not to mention the card’s number, expiration and CVV. If you don’t want the guy who finds it in the trash to go on a spending spree on you, here’s some better way of getting rid of the card.

Ideally, a card shredding machine, such as the one banks have, would be great, but those are too expensive for the home user. Many regular SOHO shredders can also shred credit cards, and that’s good too. If, however, you don’t have one, or prefer manual control over this, I suggest this simple technique from the kitchen.

The idea is similar to how you chop onions. 1st, use scissors to do multiple cuts in the card from top to bottom, but not all the way. You would end up with a sort-of “comb” pattern. Then, use the scissors to cut the card multiple times from left to right, so that the card shreds to small pieces. I strongly recommend doing the 2nd stage above a trashcan, as the cut pieces can fly. Here it is in pictures:


If you want to add one more layer of security to all this, you might want to spread the pieces between several trash bags, or better yet – take half of the debris and dump it somewhere completely different, like at the office or at school. Congrats! You’re safe!

Thursday, October 8, 2009

Ambiance

A few decades ago, someone discovered an interesting fact – placing a light source behind or to the side of a TV enhances the viewing experience significantly. I’m sure there’s some interesting explanation for this, but I’ve experienced it myself, and I can attest to its truthfulness. Philips, the well known Dutch electronics company, is also on to it, and a few years ago developed a line of televisions with what they call “Ambilight”. This is based on a special light source that’s embedded in the TV’s side, and lights the wall behind the TV. The Ambilight TVs cost a pretty penny, of course, but you can have a similar effect for much cheaper, and without replacing the TV.

The trick is simple – buy a set of two elongated light sources, like a small CCFL (Fluorescent) lamp, and hang them behind the TV so that they are pointing towards the wall. A better option is a LED-based light, which you can buy at your local store for around 15$ per light. With most TVs, you can use double-sided tape to stick it behind the TV. Other sets will allow other arrangement, like screwing the light on the back at the proper height, or even hanging the light from one of the screws on the TVs back. The technique is not that important, as long as the light is pointing towards the wall.

In my case, this is the way my TV looks now:


One thing still makes the Philips TVs a little better than my $30 setup...their ambilight actually changes color based on the content displayed onscreen. Is that worth it...you be the judge.

Saturday, August 22, 2009

Move your S

This week’s post is dedicated to tips and tricks about moving…a topic I’m handling this week as I’m moving myself.

Now is a particularly good time to move, as market prices have dropped by as much as %35, but many home owners and apartment managers rely on your laziness (to scope the market or to suffer the agonizing task of moving) and will not reduce the rent significantly for lease renewals. It often requires you to file an intent-to-not-renew notice to get them to crack, but I say that you should just send the letter, and look for a new place anyway. My wife and I have been living in a 1300 Sq Ft apartment, and now for the exact same price, we are getting a 2500 Sq Ft house, less than ½ a mile from where we are now.

Assuming you are moving indeed, the 1st thing you’re going to need is a moving company. Even if you can carry most of your stuff by yourself, you would probably still need help carrying the couch, cabinets and your books. Make sure you have an estimator from the moving company come look at the place before the move, and don’t rely on your own estimates. If you get too few movers on the job because you forgot to consider the stuff in the garage, not only will you end up paying more, but the movers will work more, be tired, and more likely to break things. Also, it’s very important to schedule the move as the 1st job in the morning, and preferably on the 1st day of the week. That will guarantee that the carriers will be as fresh, strong and alert as possible.

You would need boxes for your stuff. It’s not always easy to estimate how many you’ll need, so if you had a moving company estimator come in, you might consult him/her, but don’t wait too long – you should start packing the non-essentials a month ahead of the move. You might find free moving boxes from your colleagues at work, if you’re lucky, and you should also ask your I.T. group – they often store the boxes computers come in. If not, this website offers an interesting service: http://www.freecardboardboxes.com/ . You open an account, and can give or get free boxes from others. If this does not work out, the two other best options are buying the boxes from u-Haul or Home Depot. I’ve found that Home depot are the cheapest – less than 1$ per medium box. U-Haul sell the same box for 2.35$, but they also promise to buy the boxes back from you. I don’t know how much they pay back, but I doubt it will come down to cheaper than Home Depot. Some moving companies will sell you boxes at reasonable rates, and some might even give them for free, so that’s worth checking out too.

Another thing that’s very important is to mark the boxes, so the carriers know where to put them. Most people write on the box with a felt-tip pen, but that’s the hard way. U-Haul also sells packing tape with room names printed on them – they have Living room, Bedroom, Kitchen, Family Room, Storage, Bathroom and a few others, and even a “fragile” tape. The tape sells for $2 a role that has 30 yards. They intend for you to use the tape to close the boxes off, but I recommend getting a tape-dispenser gun at the USPS (cheap, high quality tape) and cut single words off the u-Haul tape. I tape the room name once on every side of each box, and so a 2$ role will cover about 60 boxes. When you do make your boxes, make sure you prepare several “open first” boxes. The last thing you need is to have to start hunting for a screwdriver, a towel or a coat through 100 boxes. Also, get a floor plan of the new place, and carefully plan where you plan to put the major things. Designate the target location for every piece of furniture, and mark them clearly. The point of this is to prevent a situation where the carriers placed the sofa in your family room, and you have no way of carrying it to the living room without hiring more help. You can, of course, try to be around and tell them what to do, but if there are 2 of you, and 4 of them, that might be confusing and frustrating.

If the boxes you have a lattened out, as most come, there’s not much point in running multiple lines of tape under the main seam, but it’s important to run two cross lines at the bottom left and right of the box. This is what gives the box it’s tensile strength, and especially so for heavy items such as books.

Another thing that might come in handy is a moving dolly, which lets you carry around 2-4 boxes in each go instead of one, and saves some back pain as well. U-Haul will rent you a dolly for 7$ a day, but keep in mind that you can buy a new basic dolly for about $30 (http://www.amazon.com/Magna-Cart-Personal-Hand-Truck/dp/B000HVVSDU). The above link is a folding dolly which you can keep around the house for later on. This could be a good investment.

Happy moving!

Tuesday, August 11, 2009

Pens envy


How about this unique pen holder for your desk?
This requires very little work, really – the pen plastic holder piece can be found in places like Michaels, or you can just buy a cheap desktop holder and take it apart. The processor I’m using is an original Pentium Pro, which can be found on eBay for less than $20 (personally, I would have thought they would be cheaper nowadays), but any other processor can be used. The advantage of the Pentium Pro in this case is that it’s quite heavy and holds the pen nice and stable, but you can use any other CPU, and if it’s too light, you can just glue it to a piece of wood, glass or metal.
The next step is to just glue the pen holder to the processor, and you’re done!

Sunday, July 5, 2009

Telemarket THIS

Telemarket THISWe all hate telemarketing, don’t we? I hate them too, and thankfully, I don’t hear them a lot around here. However, there used to be a time where some newspaper that I was subscribed to nagged me almost weekly, trying to get me to re-subscribe. When all my requests to be removed were ignored, I decided to take a more aggressive tactic.

Here’s the trick: When you pick up the phone, and someone asks for or your spouse by NAME, don’t confirm or transfer. Ask “who is this, please?” Even the slimiest telemarketers will answer truthfully to this. At this point, don’t just ask to be removed…give them a reason that will get them running. It might be something appropriate, if you’re a good improviser. For example, if they are offering you a TV or newspaper subscription, tell them that you have suffered an accident and have gone blind. If it’s a phone company, tell them that you’re the person’s brother/son/caretaker and that the person cannot answer the phone because his ears were injured and he is now deaf. If you just want to make it quick, tell’em the person is dead. Killed in a car crash works well. Make sure to stress how painful it is and ask the telemarketer “Can you imagine how such an offer makes us feel at this time? Please don’t call back”. Make sure you repeat their name – most of them will be scared of a lawsuit and will take you off the list right away. Don’t overdo it, by the way. Don’t go into details, so they won’t think it’s a prank or a shake-off.

Speaking of aggressive marketing – many companies will sell your address to just about anybody. In fact, many of them will lure you in with free gifts or very cheap merchandise, just to get an address. A big customer list is an expensive thing and selling your address to multiple buyers is a good and steady income. Well, other than being paranoid and not giving the address, of course, there’s one more technique I often use.

When I do need to give an address – I add a little extension to my last name, to link it to this business. For example, if make an online purchase at Jimmy’s Flower’s, I’ll list my name as “Erez Ben Arijf”. The JF at the end signify “Jimmy’s Flowers”. It won’t interfere with the mail delivery, but if, at a later time, I get a letter from another company, I’ll know exactly who sold them my address. If I can do something about it is uncertain – that depends on local laws and things you might have agreed to when signing up originally, but at least you’ll know. It’s a good idea, of course, to keep track of these addresses, as you might forget what BS stands for in a year.

A similar idea is for Email subscriptions. Since free accounts are a common thing, you can create a new account whenever you need to provide your Email, and set it to forward to your day-to-day account. If you start receiving spam, you can see it was forwarded from the Email headers, and stop the forwarding from that account. You should also use an address from www.mailinator.com wherever possible. Mailinator is a service that receives mail to ANY box at @mailinator.com and saves it for a short time. It’s good when you need to give SOME email, and works well for a single-time use, like when making an online order.

Wednesday, June 17, 2009

Give’em some credit

Knives come in all shapes and sizes, but this recipe is for an unusual one – a knife concealed as a credit card. In the movie Glimmer Man, noted martial artist Steven Segal used one to surprise-attack a group of mobsters. Such a knife is not really hard to do, just be careful about carrying it in your wallet. If it gets picked up by the airport scanners, you could get in trouble.

1) Get 3 cards – 1 normal credit card (preferably expired), one card that is not a credit card (because they are not flat), but has a magnetic stripe on the back, and a 3rd card that is of the same size, but does not have to have any markings (could be an old drivers license or company keycard, for example)


2) Get a snap-knife blade of the slim type (also known as a “Japanese Knife” blade).


3) Cut the 3rd card to shape as is illustrated in the image. The idea is that the hole in the blade will be secured using an axle and when rotated, will protrude down about ½ of an inch.


4) Cut the bottom card (no. 2) as is illustrated in the image. This hole will be used to extend the knife, and hold it in place.


5) Cut a hole in the 1st and 3rd cards, about 1/16” wide. Try to make the holes exactly above each other. This will be used to hold the axle that holds the blade in place.

6) Using simple contact glue, glue the bottom card (no. 3) to the middle shape (card no.2). Try to make the gluing as clean as possible, with no glue traces on the contour lines.

7) Place the blade in the cavity that’s in the 2nd card.


8) Glue the top card (no.2) to the middle one, and again – try to make it clean.

9) Use a piece of soft plastic as the axle, and insert it through the top hole, the blade’s hole, and the bottom hole.

10) Cut the axle so that it protrudes only about 1/16” to each side.

11) Using something hot, push on the axle’s ends, and flatten them. This can be done with a soldering iron, but works just as well with a large nail’s head, heated over the stove-top. Ideally, the outcome will be an H shaped axle, as flat as possible on the credit card.

12) Now, use your finger to push out the blade and hold it in place. Practice extending it quickly and holding it steady. Keep in mind that the blade is really sharp, and if you keep the knife in your pocket or wallet, it has no safety and can extend and cut the wallet or wound you.


Sunday, June 7, 2009

Hold my hand

I’ve already discussed 3D photography on my last entry here, but this time I want to talk a little more about making things easier. The trick to 3D photography is taking two pictures, with the camera a certain distance apart in each one. If your hands are stable, you can just snap one and move the camera, but a better option is to use some sort of camera mount to help you along. Using some simple items from the Lowe’s, you can build a special camera slide for 3D shooting for less than $20. Here’s how.

The main component is a ball-bearing drawer slides. By attaching a pair of cameras to a slide, you can easily move the cameras in parallel. My slide mount was built using a D806 16” slides, which sell for around 12$ in hardware stores. You will also need some 3/8” thick wood, some tee-nuts and “key” screws, a flat metal attachment plate, as well as some other smaller screws.

1) Attach the thin part of the 1st slide to the 2nd using small nuts and bolts. The nuts and bolts should be small, so as to not interfere with the closing of the slides. This essentially creates a single slider that can be extended from 16” to 47.5”.


1) Saw the 3/8” thick wood into 3 pieces – 2 of them about 4” long each, and a 3rd about 2.5”. The ideal width of the board is about 2.5”, but that does not have to be exact. The longer pieces will hold to cameras to the slide, and the 3rd will hold the slide to a regular tripod.
2) Attach one of the two long wood pieces (Approx 4” long) to the slide, using small wood-screws.


3) Bend the metal attachment plate to a U-shape, roughly 1.5” wide. This piece will attach the 2nd camera to the bottom part of the slider.
4) Using small nuts and bolts, attach the plate to the bottom slider, at about the 5”-6” of its length.
5) Attach the 2nd long wood pieces to the U-shaped attachment plate. Ideally, the wood pieces should be touching each other when the slide is in a closed position.


6) Drill a ¼” hold in each wood plate, through which you will insert the key-screws and attach the cameras to the slides. You can use basically any ¼” screw for this, but key-type screws will allow you to attach and remove the cameras at will without using tools. You will also have to use a thicker drill-bit, about 6/16”, and widen the bottom-part of the hole, to allow the key-screw to get in a little more; otherwise it will not be able to reach the camera. It needs to protrude above the upper surface of the wood piece for about 2/16”-3/16”. The location of the hole would be in accordance with your cameras, in order to place them in the middle of the board. This does not have to be exact. In my setup, the screw hole is at the back-side of the wood, so the entry point is at the back, allowing me easy access to remove the cameras.


7) Drill a similar hole in the smaller wooden piece, exactly in the middle, and hammer-in a “tee nut”. If you have chosen too-soft wood, it might buckle under the pressure, as the slides can be quite heavy. Turn the wood up-side-down, and attach it to the bottom of the slide. Make sure the tee-nut is hammered in at the TOP of the piece of wood, as it is supposed to be supported by the wood against the pressure from the tripod screw. The screws that attach it to the slide need to be strong, so as to not get pulled out by the weight of it all. In fact, when the slide is fully extended, it will be much heavier on one side, so support it with your hand, or another tripod to make sure it doesn’t fall apart. In fact, make sure your tripod is sturdy and heavy in the 1st place.


To use this, an ideal setup would include two identical cameras, and you would pull them apart on the slide to a distance that’s 1/30 of the distance from the camera to the closest object seen in the photo. Pressing both shutters simultaneously is key to getting a good picture for moving things like people, animals or traffic.


Sunday, May 24, 2009

You are entering another dimension

Having less and less advantages to offer over home cinema, the movie studios have come up with a new plan to draw us to the movie theaters – 3D movies. With movies like Monsters and Aliens, Avatar, and many others, looks like 3D photography is going to be, if not successful, at least mainstream. Shooting in three dimensions may seem difficult, but in fact it is quite easy, and anyone with any camera can do it – even a phone camera.

Taking the shots is rather easy – all you have to do is realize the way the human vision works – each eye gives the brain a little different angle of the world, and the brain analyzes the difference to know the distance of everything from the viewer. If you compare the image seen by both eyes, by blinking with alternating eyes, you will notice that things are “shifted” left or right, and the close something is, the more it is shifted. To get this effect, all you have to do is take two pictures with your camera in a similar fashion – take one picture for the left eye, and another for the right one.

Taking a picture this way is simple, but the distance you move between the left and right image is important – if you move too little, the image will be flat, and if too much, the image might cause dizziness. To calculate the optimal distance, measure or estimate the distance between yourself and the closest object seen in the image, and divide that by 30. For example, if you see a bush in the front that is 15 feet away, then move 6 inches between the images. You should strive to keep the camera as level as possible between shots, and try to have the farthest object in the picture “move” as little as possible. This is easy if your Camera has a focus assist dot or cross onscreen – note where that cross touches, and after the move, aim the cross at the same point. This is not critical, as all these can be corrected later on, but it saves some trouble.

The biggest challenge of using this technique is that if something in the picture moves between the shots, it will appear weird in the composed 3D image. Taking pictures of inanimate objects or views is simple, but shooting people, animals or traffic is almost impossible (you can ask an adult to stay still, but that rarely works with a busy city intersection…). For this, the solution is to use two cameras, and take the photo simultaneously. It is important to have the cameras of the same model, or at least with the same lens, as different focal length will make the final images almost impossible to align without extensive graphics processing. Another option is to use a special 3D adapter, such as the one offered by Loreo. This adapter “splits” the image coming into the camera with a prism, creating the image at once. The main disadvantage to this is that the distance is fixed, so it is optimized for close-range shots. Recently some other equipment came to the market – the Minoru, which is a 3D webcam designed specifically for this. The quality is far from great, but this is nice to have. Soon, Fuji is planning on releasing a 3D digital camera, and I imagine many others are working on this as well.


Once the stereo pair is ready, the next challenge is to show the image correctly. The key here is to give each eye its own separate picture. The traditional way is using red-blue glasses. This is not perfect, as it distorts the color and if there are objects that are blue or red originally, they might appear “blinking”. Nevertheless, this is still the simplest way – download Stereo Photo Maker (http://stereo.jpn.org/eng/stphmkr/) and use it to combine the shots into one – the red/blue glasses are easily available online, usually for less than a buck for a paper-based pair, and there are higher quality glasses for little more. The software pictured below is another one, but all of them allow you to calibrate the picture position to achieve the best results.


And the end result (The Black Soldier monument in Boston):


Another way, which I won’t detail here, is to use Lenticular lens. This entails creating an interlaced image that combines both left and right images, and then placing a special sheet that contains thousands of narrow lens that project the slices into the eyes separately. This might be familiar to you from advertisements that have been popular recently. A Lenticular lens sheet costs about 5$ for a 4x6 image, and if you buy enough of them, it can reach less than a dollar. Unfortunately, Lenticular for personal use is still quite rare, so they are hard to find unless you are willing to spend 200$.

Sunday, May 17, 2009

Capacity for love

Fixing an electronic appliance would seem, for most, a very scary task. How could one find a problem within all those colorful wires and tiny parts? Well, this is indeed not very simple, and there’s a reason technicians study for years to do this job, and are often good only after several more years of gaining experience. However, there are a few minor repairs that even the layman might perform by himself, and save a lot of money.

One very common problem with a lot of electronics in recent years is exploded or burst capacitors. This happens because most makers opt for cheaper capacitors. These capacitors tend to be unable to handle the load and they burst, which can sometimes even be heard as a small “pop”. In some cases a device could work for years without a hitch, but sometimes an entire production series could quit working very shortly en-mass. For example, the OptiPlex GX270 and GX280 series desktop computers by Dell, that went on sale around 2004 and onwards suffered this problem, which forced Dell to recall all the motherboards and cost the company 300 Million dollars.

This sort of problem happens with many other electronics, and can often be fixed with little experience. The symptoms could be anything, from weird crashes to a completely dead device (the Dell computers just gave some weird error on the screen and shut themselves down). If you have a problematic device, you would need to take it apart, which could be tricky in itself. While doing so, be sure to mark the cables clearly, so you know where and in what order to put them back in. Then, look for exploded capacitors. They aren’t really exploded – there won’t be any charred remains or severed human fingers with blood, but an exploded capacitor will often bulge out a little – usually by a millimeter or so. Here’s a picture of one:


If you’ve found one, you might try to replace it. This can be done in a few minutes, and In many cases, will make the problem go away.

------------------------------------------------------------------------------------------
WORD OF WARNING!!!Opening up electronic equipment is not only tricky, but can also be dangerous! Some devices might hold a charge for weeks after disconnecting them from the socket, and touching the wrong thing can kill you. This is common with CRT monitors, for example, so be careful, and if you really never soldered anything, you might consider doing this with someone who has some experience, or even drop the idea completely.
------------------------------------------------------------------------------------------

1) The first step is identifying the faulty capacitor. Capacitors have 3 characteristics:
a. Voltage, measured in Volts
b. Capacitance, measures in Farads
c. Form – Axial or Radial.

In most household appliances, the capacitors will be quite small, measuring at around 10-40 Volts, and several hundred Micro-Farads (printed us µF). A Radial capacitor has both its connectors at the bottom, while an Axial one has the connectors protruding from its ends – like a skewer. For most repairs, you could use any capacitor, as they have long-enough leads that will allow you to bend them into a shape that will fit the board.


2) The 2nd step is getting the right capacitor – It’s not always easy to find the correct capacitance and voltage, but it’s OK and even recommended to get ones that are of higher value than the original. For example, an original 680 UF/25V capacitor can be safely replaced with a 1000 UF/35V. Don’t go too wild, though, and be sure that the new capacitor you buy fits inside the case, physically. You can typically find capacitors at Radio Shack, Fry’s or online, although the Shack have only a very limited selection.

3) The 3rd step is to remove the damaged capacitor/s. 1st, note the polarity of the current capacitor, indicated as a colored line along its axis, or a + and – signs at the poles. To remove the capacitor, turn on your soldering iron and heat up the contacts on the reverse side of the board and use a solder vacuum or soldering mesh to clean up as much of the solder you can. If you’re lucky, you will then be able to pull the old one straight out. If you’re less lucky, you might have to pry it out slowly, while applying heat to the contacts. Be careful, as the capacitor might heat up and burn your fingers. Sometimes there might be glue on or around the capacitors, and that gets in the way, so try to remove it gently without ripping anything out. Something that is very help is “helping hand”, which is a heavy metallic stand with clips to hold the board in place while you work on it. Some models even have a built in magnifier.
4) Once the old one is out, clean up the contacts with a soldering vacuum to expose the holes in the board, and insert the new capacitor into position. Heat the contacts and apply some solder, taking care not to use too much so it won’t leak onto other areas of the board. Be careful not to wiggle the capacitor while soldering, to prevent “cold” solders or fractures in the solder. Don’t forget to cut-clean the extra wire that remains of the capacitors contacts.


5) Once done, put back the device together and test it – be sure that when you connect it to the wall jack, don’t touch any exposed metallic surfaces. If you’re lucky and the problem was indeed caused by the faulty capacitor and it alone, the device will go back to life right away. Keep in mind that the new capacitor you’ve put in might also burn out one day, and the procedure might have to be repeated. To make things safe, better buy a good capacitor, and don’t settle for the cheapest kind – usually, even the best capacitor won’t cost more than a dollar or two, although you might need more than one to repair a device.


Tuesday, March 17, 2009

The Ari sleeps tonight

Do you use Skype? Me too, but for a long while I refrained from using it because it allows people to call you at any time they want, unless you remember to set it to Do Not Disturb or offline when you go to sleep. As most of my friends and family are in Israel, which is 10 hours ahead, this was even more troublesome. So what can YOU do?

Well, fortunately, Skype has an API – a “Application Programming Interface”, which allows anyone to write a program that will communicate with Skype directly. Many applications have APIs, which are up to the application developers to create. Microsoft, for example, has APIs for almost all of its software.

Skype’s API is not very well documented, so using theirs is not that simple, but I’m here to help. One can use that API using any programming language, but since not everyone has the tools to write and compile programs, I’ll use the built-in scripting engine of Windows to do it. This allows you to easily create the program with no prior knowledge or installation of complicated compilers.

To use this, all you have to do is open Windows’ NOTEPAD program, and copy-paste the following code into it. Then, save the file somewhere on your hard drive and give it the extension VBS. Next, edit the time-table set in the 1st two lines to select when Skype will be online and “Do Not Disturb”. Then, just use the windows scheduler to run this script once every hour. Whenever it runs, it will check the current day and time to determine if this is a weekend or not (assuming you stay up later on a weekend) and if Skype should be set to DND or online, and do it.

Note: The current settings set Skype to be DND from midnight to 9am on a weekday and from 1am to 11am on a weekend. The weekend days are set to Friday and Saturday since most people, I guess, go to sleep late on Fridays and Saturdays because they don’t have to wake up early on a Saturday and Sunday.

Code starts here:

TimeRangesOfflineWeekend = "1,2,3,4,5,6,7,8,9,10"
TimeRangesOfflineWeekday = "0,1,2,3,4,5,6,7,8"
Set oSkype = CreateObject("Skype4COM.Skype")
CurrentStatus = oSkype.CurrentUser.OnlineStatus
DND = 4
Online = 1
CurrentHour = int(timer/60/60)
Dayofweek = weekday(date)
if Dayofweek = 6 or Dayofweek = 7 then 'This is a weekend
if instr(TimeRangesOfflineWeekend,CurrentHour) then
SetSkype = 4 'Going to DND mode
else
SetSkype = 1 'Going ONLINE
end if
else 'This is NOT a weekend
if instr(TimeRangesOfflineWeekday,CurrentHour) then
SetSkype = 4 'Going to DND mode
else
SetSkype = 1 'Going ONLINE
end if
end if
oSkype.ChangeUserStatus(SetSkype)
Set oSkype = nothing


Monday, March 9, 2009

If you build it, I will come

For most people, playing in the snow means building a snow man, but I fancy much more elaborate ideas. How about an Igloo, or even a small house?

The idea is to use a brick-shaped baking pan. These 6-10$ pans are almost exactly the shape and size of a brick, and have diagonal sides designed to facilitate an easy removal of the cake. Get one or two of these, depending on how many kids or adults are in the game.


To make a brick, just throw some snow into the pan, and don’t forget to pack it as tight as you can. Flat-out the top surface with your hand or a knife (hay…why not a chainsaw!!!) and turn-over to remove the brick.


Make as many as you like and use them to build walls. Use an interlocking structure (in which each second brick is up-side-down) to get better stability. If you want a real tight construction, spread a little salt on each row before laying the next one. The salt will melt the top layer of ice, and will make the rows fuse together.

Sunday, February 15, 2009

Read'em and don't weep

Electronic books like the Sony PRS Series or the Amazon Kindle are a fantastic development. Though not cheap, they are much more convenient than keeping a stack of books by your bed, not to mention carrying on a plane. If you are buying your books from Amazon’s or Sony’s shop, you are probably very satisfied, but if you ever want to try to load a PDF file manually, things might be a little less convenient. Trying to display most publicly-available PDF files on the typical 6” screen that most ebooks have will result in disappointment – tiny fonts, barely readable. However, there IS a solution!

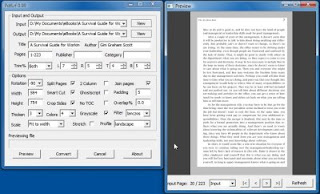
The problem is that Most PDF files are designed for printing on Letter-sized paper, and the ebook resizes it to fit, resulting in very small print. The solution is to convert the file to a more suitable size and layout. This can be done using the utility PDFLRFWIN. This software doesn’t have a home, but it can be easily found on any search engine.
To convert the book, just open the utility, and ask it to load the original file. Click PREVIEW and adjust the TRIM% settings. Increasing the trim will show black borders on the preview, and that indicates how much of the book will be trimmed after the conversion – this saves some screen real-estate. It’s important to browse through at least 10-20 pages on the preview screen, to make sure that the correct trim for one page isn’t too much for another. It’s also possible to select a profile to rotate the book, if you prefer to read it in Landscape mode. When everything is ready, just click CONVERT and wait for it to be done. This takes a little while, and can blow up the book’s size significantly, but it’s worth it.


Another good idea is to write down the trim settings you used for each book, so that if you later found out that you over-trimmed many pages, you can re-do it with less guesswork regarding the trim.


Happy reading!

Sunday, February 8, 2009

Look behind you

Replacing a car mirror is a big hassle, not only are those very expensive (up to 100$ for an original part, and around 30$ for a clone), but sometimes it's really hard to find the right one for your car. However, it's not that hard to make one yourself, and it's definitely much cheaper.

This will require some of the skills discussed in the post from Jan 6th. Be aware that working with glass is hazardous. A wrong move could lead to losing a finger or an eye, so proceed at your own risk. Also note that professional car mirrors are made of tempered glass, which shatters to tiny pieces when hit. This is considered safer in case of accidents, as regular glass can break into knife-like shards that are very dangerous when flying around. It's hard to find tempered mirror glass, and it's very hard to work using the following methods. If you decide to use regular mirror glass, be aware that it's riskier, and might be against the law in some states and countries.

1. At Home Depot or Lowe's, get a piece of mirror. You might be able to find a piece of tempered mirror, but be aware that those are hard to work. Also, get some two-sided thick tape. Be sure that's good quality tape, so the new mirror won't fall off in the 1st curve. You will also need a glass-cutting kit, a sharpie, a metal ruler and a pair of pliers.

2. Tape a piece of clear plastic to the original mirror, and draw-out the shape of the mirror using a sharpie. A sharpie is usually thick, so take note which side of the trace is the "actual" shape (mostly, we would draw from inside the frame, making the out line "count").

3. Cut the plastic around the shape using scissors.

4. Tape that to the uncut mirror, and re-trace the shape on the mirror using the sharpie.


5. Using standard glass-cutting method cut the mirror to a shape approximating the right shape, leaving off the corners.


6. Using the pliers, chip-off little pieces of the glass, thus gnawing it to the right shape. It doesn't have to be ultra-precise - just as long as it fits in the frame. A normal mirror can be chipped-down in about 10 minutes. It might take a few attempts until you get it to match perfectly.


7. Using the double-sided tape, glue the mirror into place. It can be glued directly on a previous sheet of glass, or the old glass can be shattered and remove, and then glued on the frame. 8. for advanced and experienced users: You can also do this using a wide-angle panoramic mirror, which are even more expensive. This, however, is much trickier as their uneven surface makes them very hard to cut straight. My recommendation is to use the chipping method to skip step 5 and shape the glass complete using the pliers. It's time consuming, and not without risk, but may be worth the time.

Drive safely!


Saturday, January 17, 2009

Look Closely

The iPhone is pretty popular, but many feel that its camera is somewhat limited. There are several kits out there to add zoom or wide-angle to the phone, but mostly at unfriendly prices (much like the phone itself...). There is, however, an easy and cheap way to take close-up photos with the phone.

The simplest and cheapest way is to use any magnifying glass. Just get a 50 cents piece from an office or toy store and hold it in front of the phone's lens. This way, you can take reasonable sharp images at about 2 inches. Keep in mind, though, that a good picture requires light!

A big challenge in this scenario could be holding it together. You need one hand to hold the phone, another for the magnifier and a 3rd for pushing the shutter button. A good solution that is not too expensive is getting the Victorinox SwissCard Lite. These cost about 20 dollars, and can be very handy for a lot of things. The SwissCard Lite has a small magnifier at its corner, so it's very convenient to hold against the phone with one hand, freeing the other one for hitting the shutter.
This solution, BTW, can be used with pretty much every camera phone in existence, as most of them don't have Macro mode.
Another little helper is the Fast Tap Camera application, available on the App Store for 1$. This application deals with one of the primary problems of the phone - the small size of the shutter button. With this app, the entire screen is the shutter button, so you can take a picture of yourself or just shoot at weird angels without fondling around for the little button.

Friday, January 9, 2009

Rise and Shine

At some age, most kids discover the fun in building plastic model kits of planes, cars and ships. Unfortunately, the excitement usually wears off pretty fast, and even before that, few kids have the attention and patience required to actually paint the models properly. Shortly after, there are a bunch of models laying around and eventually they are dumped in the trash, but there’s one more trick that’s worth trying.

If you have a model that’s about to be thrown away, don’t do it! Instead, go to Home Depot or Lowe's and get a can of gold or silver spray paint. Be sure to get the ultra-glossy stuff! Put the model on some old newspapers and spray-paint it. It takes only a few minutes to paint the entire thing, and usually less than ½ an hour to dry. You might have to turn it up-side-down to complete the paint.

The finished product will have a whole new meaning, and might even be worth hanging on your wall! Check out this painted Enterprise-D:


Tuesday, January 6, 2009

Mr. Glass

Cutting glass might seem intimidating, but this skill can be perfected rather quickly and easily, and can be very useful. Want to learn how?

Before you try this, beware – glass is not very tolerant of mistakes, and one false move could lead to a nasty injury. Even doing a perfect job would often leave little shards laying around, so don’t do this in your living room. Until you get used to it, better wear good work-gloves and cover your face with a mask or protective glasses.

To cut glass, all you need is a rotary glass cutter. These are often sold as kits, for around 5-10$ at any home depot or Lowe’s. A typical kit contains the cutter, a bottle of cutting oil, and sometimes some instructions as well. If you have such a cutter at home already, be sure not to let it get old. If it gets rusty or worn-out, it will not do its job well. Also, the cutting oil is much more important than you might realize. Another important tool is a metal ruler.
To cut the glass, place your ruler and tape it to the glass using some tape – the tape goes on the side of the ruler opposite where we intend to cut, of course! Dip the rotary cutter in the oil and shake-off any excess. Using the cutter, scratch the glass from end to end in a fast and uniform movement. Make sure you do it from end-to-end and not leaving even a few millimeters undone, as this could lead to the whole piece breaking unevenly. Note that the rotary blade is usually small, so you’ll have to find the right angle of holding it, so the ruler doesn’t keep it too high to touch the glass. Use just little pressure – the cut doesn’t have to be deep, and no matter what, don’t be tempted to do another round. If you missed it the 1st time, make another cut at least 1 inch to the left or right, or get a new sheet of glass. Doing the scratch correctly is the hardest part, and it may take a few practices until you get it right.

After the scratch, remove the ruler and turn over the glass. Tap on it gently along the scratch a few times using something hard. Usually, the other end of the glass cutter would be shaped like a ball, ideally for this. The tapping is not supposed to break the glass, but to give it tiny invisible cracks which will “prepare” it for the final break.
Place the glass over a table-edge, and hold it in place. Push gently the protruding side, while holding the glass well so it doesn’t fall to the floor after breaking. Just a small amount of pressure is all that is needed, and the glass should usually break cleanly and easily. Another way is to raise the glass and place a pencil under the scratch, and then push on the glass to make it break. Doing this for the first time is a lot of fun – it feels great to see how it breaks so easily and quickly.
--- >>>
Lastly, use some fine sandpaper to smooth the glass edges. Be sure to use gloves at this stage, as the glass could cut the paper and go straight through your hand.
Congratulations! You are a glass cutter!


Saturday, January 3, 2009

Space - the final frontier

If you are also tired of empty cans filling up your trash, you might be inclined to buy a can compactor (a.k.a Can Crusher). However, if you can't or prefer to do things the old fashioned way (by brute force!), here's a way to compact cans by hand, that doesn't require too much strength.
1. Hold the middle of the can with both hands, so that your forefingers and thumbs form a square around the can.

2. Press lightly with all four fingers to bend the can walls inwards, in the shape of a square.
3. Use your thumbs to bend the aluminum above and under the middle-bend. The right thumb pushes right, and the left one pushes left. Repeat four times for each "corner" of the square from step 2.
4. Place the can on a flat surface, and push on it with your palm, while rotating to the left.
5. The bent-pattern you created causes the can to twist and compress, requiring minimal force. Even a child could compress a can to 1/3 of its full size.
Word of caution - I've never been hurt using this method, but if you press hard enough, you could injure yourself. Also, never attempt to perform step 4 too fast, as it could cause the can to fly to the side or bend in a way to injure your hand. Practice at your own risk!