Sunday, February 15, 2009

Read'em and don't weep

Electronic books like the Sony PRS Series or the Amazon Kindle are a fantastic development. Though not cheap, they are much more convenient than keeping a stack of books by your bed, not to mention carrying on a plane. If you are buying your books from Amazon’s or Sony’s shop, you are probably very satisfied, but if you ever want to try to load a PDF file manually, things might be a little less convenient. Trying to display most publicly-available PDF files on the typical 6” screen that most ebooks have will result in disappointment – tiny fonts, barely readable. However, there IS a solution!

The problem is that Most PDF files are designed for printing on Letter-sized paper, and the ebook resizes it to fit, resulting in very small print. The solution is to convert the file to a more suitable size and layout. This can be done using the utility PDFLRFWIN. This software doesn’t have a home, but it can be easily found on any search engine.
To convert the book, just open the utility, and ask it to load the original file. Click PREVIEW and adjust the TRIM% settings. Increasing the trim will show black borders on the preview, and that indicates how much of the book will be trimmed after the conversion – this saves some screen real-estate. It’s important to browse through at least 10-20 pages on the preview screen, to make sure that the correct trim for one page isn’t too much for another. It’s also possible to select a profile to rotate the book, if you prefer to read it in Landscape mode. When everything is ready, just click CONVERT and wait for it to be done. This takes a little while, and can blow up the book’s size significantly, but it’s worth it.
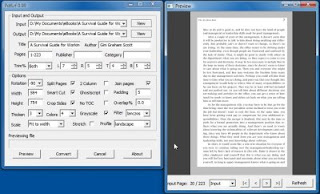

Another good idea is to write down the trim settings you used for each book, so that if you later found out that you over-trimmed many pages, you can re-do it with less guesswork regarding the trim.


Happy reading!

Sunday, February 8, 2009

Look behind you

Replacing a car mirror is a big hassle, not only are those very expensive (up to 100$ for an original part, and around 30$ for a clone), but sometimes it's really hard to find the right one for your car. However, it's not that hard to make one yourself, and it's definitely much cheaper.

This will require some of the skills discussed in the post from Jan 6th. Be aware that working with glass is hazardous. A wrong move could lead to losing a finger or an eye, so proceed at your own risk. Also note that professional car mirrors are made of tempered glass, which shatters to tiny pieces when hit. This is considered safer in case of accidents, as regular glass can break into knife-like shards that are very dangerous when flying around. It's hard to find tempered mirror glass, and it's very hard to work using the following methods. If you decide to use regular mirror glass, be aware that it's riskier, and might be against the law in some states and countries.

1. At Home Depot or Lowe's, get a piece of mirror. You might be able to find a piece of tempered mirror, but be aware that those are hard to work. Also, get some two-sided thick tape. Be sure that's good quality tape, so the new mirror won't fall off in the 1st curve. You will also need a glass-cutting kit, a sharpie, a metal ruler and a pair of pliers.

2. Tape a piece of clear plastic to the original mirror, and draw-out the shape of the mirror using a sharpie. A sharpie is usually thick, so take note which side of the trace is the "actual" shape (mostly, we would draw from inside the frame, making the out line "count").

3. Cut the plastic around the shape using scissors.

4. Tape that to the uncut mirror, and re-trace the shape on the mirror using the sharpie.


5. Using standard glass-cutting method cut the mirror to a shape approximating the right shape, leaving off the corners.


6. Using the pliers, chip-off little pieces of the glass, thus gnawing it to the right shape. It doesn't have to be ultra-precise - just as long as it fits in the frame. A normal mirror can be chipped-down in about 10 minutes. It might take a few attempts until you get it to match perfectly.


7. Using the double-sided tape, glue the mirror into place. It can be glued directly on a previous sheet of glass, or the old glass can be shattered and remove, and then glued on the frame. 8. for advanced and experienced users: You can also do this using a wide-angle panoramic mirror, which are even more expensive. This, however, is much trickier as their uneven surface makes them very hard to cut straight. My recommendation is to use the chipping method to skip step 5 and shape the glass complete using the pliers. It's time consuming, and not without risk, but may be worth the time.

Drive safely!